Sorry, we got hacked :-(
Sorry everyone we got hacked and it will take us a little while to put the site back together. Please be patient with us.
I've been maintaining FX Experience for a really long time now, and I love hearing from people who enjoy my weekly links roundup. One thing I've noticed recently is that maintaining two sites (FX Experience and JonathanGiles.net) takes more time than ideal, and splits the audience up. Therefore, FX Experience will become read-only for new blog posts, but weekly posts will continue to be published on JonathanGiles.net. If you follow @FXExperience on Twitter, I suggest you also follow @JonathanGiles. This is not the end - just a consolidation of my online presence to make my life a little easier!
tl;dr: Follow me on Twitter and check for the latest news on JonathanGiles.net.
Sorry everyone we got hacked and it will take us a little while to put the site back together. Please be patient with us.
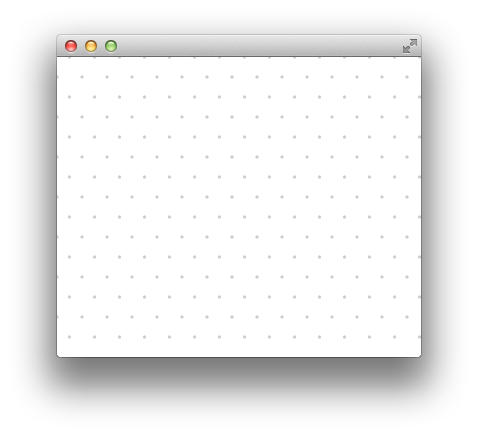
I was hacking on a application today and wanted a dot grid in the background. Canvas is well suited to this as you don’t need 1000s of nodes for every dot on the grid. Canvas by default has a fixed size so I wrapped it in a Pane to make it Resizable. I thought this might be a generally useful example to show how to create a resizable canvas node. Also if you ever need a grid, it could be applied to a normal line grid just as easily. So here is a little test app with a single node of my DotGrid.
import javafx.application.Application;
import javafx.scene.Scene;
import javafx.scene.paint.Color;
import javafx.stage.Stage;

/**
* Test app for DotGrid
*/
import javafx.application.Application;
import javafx.scene.Scene;
import javafx.scene.paint.Color;
import javafx.stage.Stage;

/**
 * Test app for DotGrid
 */
public class DotGridTestApp extends Application {

    @Override public void start(Stage stage) throws Exception {
        stage.setScene(new Scene(new DotGrid(), Color.WHITE));
        stage.show();
    }

    public static void main(String[] args) {
        launch(args);
    }
}
import javafx.scene.canvas.Canvas;
import javafx.scene.canvas.GraphicsContext;
import javafx.scene.layout.Pane;
import javafx.scene.paint.Color;

/**
 * A node that draws a triangle grid of dots using canvas
 */
public class DotGrid extends Pane {
    private static final double SPACING_X = 25;
    private static final double SPACING_Y = 20;
    private static final double RADIUS = 1.5;
    private Canvas canvas = new Canvas();

    public DotGrid() {
        getChildren().add(canvas);
    }

    @Override protected void layoutChildren() {
        final int top = (int)snappedTopInset();
        final int right = (int)snappedRightInset();
        final int bottom = (int)snappedBottomInset();
        final int left = (int)snappedLeftInset();
        final int w = (int)getWidth() - left - right;
        final int h = (int)getHeight() - top - bottom;
        canvas.setLayoutX(left);
        canvas.setLayoutY(top);
        if (w != canvas.getWidth() || h != canvas.getHeight()) {
            canvas.setWidth(w);
            canvas.setHeight(h);
            GraphicsContext g = canvas.getGraphicsContext2D();
            g.clearRect(0, 0, w, h);
            g.setFill(Color.gray(0,0.2));

            for (int x = 0; x < w; x += SPACING_X) {
                for (int y = 0; y < h; y += SPACING_Y) {
                    double offsetY = (y%(2*SPACING_Y)) == 0 ? SPACING_X /2 : 0;
                    g.fillOval(x-RADIUS+offsetY,y-RADIUS,RADIUS+RADIUS,RADIUS+RADIUS);
                }
            }
        }
    }
}
There really is not much too it, when the layout is applied to Pane check if size has changed and redraw the canvas. There are a couple of optimizations you could do here if performance was a issue.
In this case I have not set any preferred size for the DotGrid so it will be whatever size its parent wants it to be. If you need it to be a minimum size you could call setPrefSize() or setMinSize() in the constructor.
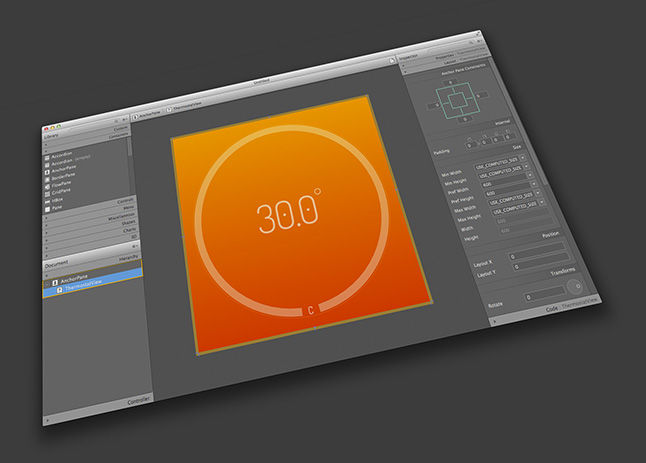
Amazing news everyone, SceneBuilder 2.0 is released today. It has many cool new features and was a complete rewrite from the ground up so that it can be split into parts and embedded in your favorite IDE.
Mo has put up a great video tutorial for SceneBuilder 2 on YouTube: Watch
FX8 in the Library panel’s search text field.

We put together a demo that shows what JavaFX can do on a RaspberryPi running fill 1080p HD on a TV using 5 way navigation(Arrows + Select). I hope you enjoy it, we had a lot of fun making it.
The first section of the video is a real recording direct of the HDMI output of the Raspberry Pi. So you can see the raw performance of the device, though video capture was limited to 30fps when the Pi was rendering at 60fps much of the time. The second section is a demo of how SceneBuilder could be used to build one of the demos. In all the menus we show the little overlay of arrow keys in top right corner so you can see how the menu is being navigated.
There are 4 separate menu demos:
Its mostly running on the shipping EA of JavaFX 8 Embedded we prototyped a couple changes to the platform that we are working on making them real and I hope they will make it into 8 but not sure yet if we will have time. The changes are some performance improvements to how we draw into frame buffer, also the ability to draw JavaFX with transparent background on a hardware layer over hardware decoded video.
I just got a 3D Connexion SpaceNavigator which is a kind of 3D input device(mouse/stick). It is cool to use when 3D modeling content for JavaFX but I thought it would be even better if I could navigate my JavaFX 3D scenes using it. I managed to hack some quick code to get it working in JavaFX. Many thanks to the JInput project, they made it super easy. Its super fun so I recoded a little video to share with you.
SpaceNavigator with JavaFX from Jasper Potts on Vimeo.
The code really is very simple, I just have a AnimationTimer that every frame checks to get the current inputs from device and applies them to the camera transforms. The device via jinput provides 6 floats for each axis and 2 booleans for the buttons, so could not be easier to connect to your app. Below is complete 3D app with a simple cube. I will be working on getting the object importers out in open source for you to use very soon 🙂
public class InputTestBlog extends Application {
    private ControllerEnvironment controllerEnvironment;
    private Controller spaceNavigator;
    private Component[] components;
    private Translate translate;
    private Rotate rotateX,rotateY,rotateZ;

    @Override public void start(Stage stage) throws Exception {
        controllerEnvironment = ControllerEnvironment.getDefaultEnvironment();
        Controller[] controllers = controllerEnvironment.getControllers();
        for(Controller controller: controllers){
            if ("SpaceNavigator".equalsIgnoreCase(controller.getName())){
                spaceNavigator = controller;
                System.out.println("USING Device ["+controller.getName()+"] of type ["+controller.getType().toString()+"]");
                components = spaceNavigator.getComponents();
            }
        }

        Group root = new Group();
        Scene scene = new Scene(root, 1024, 768, true);
        stage.setScene(scene);
        scene.setFill(Color.GRAY);
        // CAMERA
        final PerspectiveCamera camera = new PerspectiveCamera(true);
        scene.setCamera(camera);
        root.getChildren().add(camera);
        // BOX
        Box testBox = new Box(5,5,5);
        testBox.setMaterial(new PhongMaterial(Color.RED));
        testBox.setDrawMode(DrawMode.LINE);
        root.getChildren().add(testBox);
        // MOVE CAMERA
        camera.getTransforms().addAll(
                rotateY = new Rotate(-20, Rotate.Y_AXIS),
                rotateX = new Rotate(-20, Rotate.X_AXIS),
                rotateZ = new Rotate(0, Rotate.Z_AXIS),
                translate = new Translate(5, -5, -15)
        );
        // SHOW STAGE
        stage.show();
        // CHECK FOR INPUT
        if (spaceNavigator != null) {
            new AnimationTimer() {
                @Override public void handle(long l) {
                    if (spaceNavigator.poll()) {
                        for(Component component: components) {
                            switch(component.getName()) {
                                case "x":
                                    translate.setX(translate.getX() + component.getPollData());
                                    break;
                                case "y":
                                    translate.setY(translate.getY()+component.getPollData());
                                    break;
                                case "z":
                                    translate.setZ(translate.getZ()+component.getPollData());
                                    break;
                                case "rx":
                                    rotateX.setAngle(rotateX.getAngle()+component.getPollData());
                                    break;
                                case "ry":
                                    rotateY.setAngle(rotateY.getAngle()+component.getPollData());
                                    break;
                                case "rz":
                                    rotateZ.setAngle(rotateZ.getAngle()+component.getPollData());
                                    break;
                            }
                        }
                    }
                }
            }.start();
        }
    }

    public static void main(String[] args) {
        System.setProperty("net.java.games.input.librarypath", new File("lib").getAbsolutePath());
        launch(args);
    }
}
Gluon offers industry-leading solutions for mobile and cloud, as well as professional Java and JavaFX consultancy.

FX Experience is maintained by Jonathan Giles.