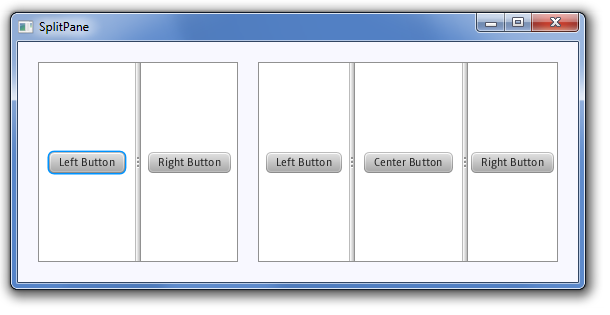
We’ve introduced a SplitPane control in JavaFX 2.0, and today I thought I’d point out an interesting subtlety in the API. For the longest time our SplitPane API primarily consisted of the normal ‘left’ and ‘right’ (or ‘top’ and ‘bottom’) properties (indeed, the JavaDoc as of today still refers to this API). These were synonomous – if you set ‘top’ and ‘bottom’, they were literally copied to the ‘left’ and ‘right’ code, and our SplitPaneSkin just knew to draw with the items stacked vertically, rather than to lay them out horizontally.

In the very, very late stages of the JavaFX 2.0 EA program, we decided we didn’t really like this API all that much. The concept of having both left/right and top/bottom just didn’t really gel with us. After some discussion, we thought we’d use the same API style as we do elsewhere in JavaFX 2.0: expose a collection and allow for developers to place their content into it. This mean that to use a SplitPane, you’d use code such as the following:
import javafx.application.Application;
import javafx.geometry.Orientation;
import javafx.scene.Group;
import javafx.scene.Scene;
import javafx.scene.control.Button;
import javafx.scene.control.SplitPane;
import javafx.scene.layout.HBox;
import javafx.scene.paint.Color;
import javafx.stage.Stage;

public class SplitPaneSample extends Application {

    @Override public void start(Stage stage) {
        HBox hbox = new HBox(20);
        hbox.setTranslateX(20);
        hbox.setTranslateY(20);

        SplitPane splitPane1 = new SplitPane();
        splitPane1.setPrefSize(200, 200);
        final Button l = new Button("Left Button");
        final Button r = new Button("Right Button");
        splitPane1.getItems().addAll(l, r);
        hbox.getChildren().add(splitPane1);

        Scene scene = new Scene(new Group(hbox), 560, 240);
        scene.setFill(Color.GHOSTWHITE);
        stage.setScene(scene);
        stage.setTitle("SplitPane");
        stage.setVisible(true);
    }

    public static void main(String[] args) {
        launch(args);
    }
}
The main segment of code is the middle block, where we create a SplitPane, set a preferred size, and add in the two buttons we want to display. I hope you see where I’m going with this: now that we aren’t constrained to just having ‘left’ and ‘right’ nodes, we can actually put in any number of nodes into the items collection – and the SplitPane will automatically create N – 1 dividers. For example:
        SplitPane splitPane2 = new SplitPane();
        splitPane2.setPrefSize(300, 200);
        final Button l2 = new Button("Left Button");
        final Button c2 = new Button("Center Button");
        final Button r2 = new Button("Right Button");
        splitPane2.getItems().addAll(l2, c2, r2);
        hbox.getChildren().add(splitPane2);
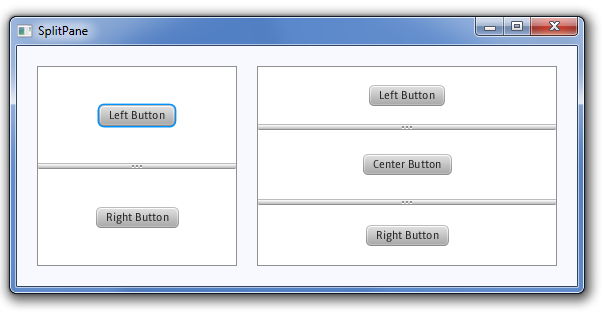
The result of this code is shown in the second SplitPane you see in the picture above. Now, a SplitPane wouldn’t be all that great if it only allows for the SplitPane content to run in a horizontal flow, so we also support setting an orientation on the SplitPane. As mentioned, the default value is HORIZONTAL, which is what you see in the screenshot above. You can also set it to VERTICAL, which you can see in the screenshot below.
        SplitPane splitPane1 = new SplitPane();
        splitPane1.setOrientation(Orientation.VERTICAL);
        splitPane1.setPrefSize(200, 200);
        final Button l1 = new Button("Left Button");
        final Button r1 = new Button("Right Button");
        splitPane1.getItems().addAll(l1, r1);
        hbox.getChildren().add(splitPane1);

        SplitPane splitPane2 = new SplitPane();
        splitPane2.setOrientation(Orientation.VERTICAL);
        splitPane2.setPrefSize(300, 200);
        final Button l2 = new Button("Left Button");
        final Button c2 = new Button("Center Button");
        final Button r2 = new Button("Right Button");
        splitPane2.getItems().addAll(l2, c2, r2);
        hbox.getChildren().add(splitPane2);

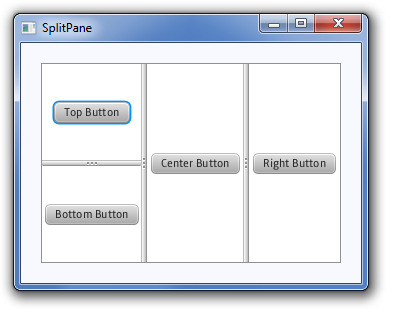
Now, you can’t have a single SplitPane with multiple orientations. However, you can quite easily embed one SplitPane inside another to get this effect:
        SplitPane splitPane1 = new SplitPane();
        splitPane1.setOrientation(Orientation.VERTICAL);
        splitPane1.setPrefSize(200, 200);
        final Button l1 = new Button("Top Button");
        final Button r1 = new Button("Bottom Button");
        splitPane1.getItems().addAll(l1, r1);

        SplitPane splitPane2 = new SplitPane();
        splitPane2.setOrientation(Orientation.HORIZONTAL);
        splitPane2.setPrefSize(300, 200);
        final Button c2 = new Button("Center Button");
        final Button r2 = new Button("Right Button");
        splitPane2.getItems().addAll(splitPane1, c2, r2);
        hbox.getChildren().add(splitPane2);
With the code above, you’ll end up with something a little like this:

I hope this helps to introduce you to our brand new SplitPane control, and I look forward to see you using it in your applications soon!


Good to be rid of Swingisms, but I don’t like the way you _have_ to embed one inside the other to get different orientations.
People don’t think in terms of embedded split panes, they just see a space partitioned by moveable dividers.
I’d like to see something more akin to a grid (with cell spanning), where the borders between cells are moveable.
At the very least you get to express things naturally and allow for a way to drag a corner point (eg in a 2×2 split pane, dragging the centre ‘cross’.)
One of the goals for JavaFX controls is that they be simple to use, but offer considerable power.
I think it is reasonable to ask developers to embed SplitPanes to allow for differing orientations in a user interface. The alternative approach, as suggested in your comment, would require considerably more API (and quite complex API at that) to enable all use cases. It would also require a possibly more complex API for the simple use cases as well. Take a look at the GridPane API we offer to get an appreciation of just how much configurability a grid layout requires.
Without actual devloper studies, it’s hard to say which API would be preferable to an end-developer, but my gut is telling me that we should keep the common use cases simple, whilst enabling the kind of UI that you and I are discussing. It’s probably easy to agree that most common use cases require one of the following combinations of SplitPane:
* A single divider.
* Two dividers in the same direction.
* Two dividers, in separate directions.
If you disagree, then I’m interested to learn more about your use cases.
There was in SwingX a JXMultiSplitPane (I think that was the name) that Hans Muller added which had a tree-like model instead of a grid, such nesting was done via nodes with hsplits & vsplits and such. Which is yet another way to handle it.
But I agree, I think having a split view run in a single direction is simpler to understand and use for the common cases. However it could be quite cool to have a MultiSplitPane which was basically the same API as Grid but used dividers along certain borders or some such, for those cases where a more complicated API is worth it. In particular I’d love to see something like this developed in the “wild” and if it is successful we could adopt the approach.
Hans Mullers MultiSplitPane is fine for simple applications (e.g. Applets). It uses a tree model with named leafs to add content. The model can be defined as a String. The parser return a RootNode that can be used as a model.
I admit that the algorithm is a bit complicated. I ported it to JavaFX as an exercise to learn JavaFX. I didn’t manage to create a skinnable control from it yet.
But for normal use cases I guess it would suffice to let SplitPane do the work. In order to get rid of the manual nesting users can extend it to support a simple tree model, like in this quick and dirty example ( don’t look to closely 😉 ):
import java.util.HashMap;
import javafx.geometry.Orientation;
import javafx.scene.Node;
import javafx.scene.control.SplitPane;
import javafx.scene.layout.StackPane;
public class MultiSplitPane extends SplitPane {
HashMap regionContent = new HashMap();
SplitNode root;
public void addNode(String name, Node node) {
StackPane contentPane = regionContent.get(name);
if (contentPane == null) {
throw new IllegalArgumentException(“invalid region ” + name);
}
contentPane.getChildren().add(node);
}
public void setLayout(SplitNode root) {
this.root = root;
setDividerPosition(0, 0.5f);
regionContent.clear();
updateModel(root, this);
}
private void updateModel(SplitNode root, SplitPane splitPane) {
splitPane.setOrientation(root.orientation);
if (root.first.leaf) {
regionContent.put(root.first.name, new StackPane());
splitPane.getItems().add(regionContent.get(root.first.name));
} else {
SplitPane childPane = new SplitPane();
childPane.setDividerPosition(0, 0.5f);
splitPane.getItems().add(childPane);
updateModel(root.first, childPane);
}
if (root.last.leaf) {
regionContent.put(root.last.name, new StackPane());
splitPane.getItems().add(regionContent.get(root.last.name));
} else {
SplitPane childPane = new SplitPane();
childPane.setDividerPosition(0, 0.5f);
splitPane.getItems().add(childPane);
updateModel(root.last, childPane);
}
}
public SplitNode testModel() {
SplitNode root = new SplitNode(false, null);
root.orientation = Orientation.HORIZONTAL;
SplitNode first = new SplitNode(true, “left”);
root.first = first;
SplitNode secondRoot = new SplitNode(false, null);
secondRoot.orientation = Orientation.VERTICAL;
root.last = secondRoot;
SplitNode topRight = new SplitNode(true, “top-right”);
secondRoot.first = topRight;
SplitNode bottomRight = new SplitNode(true, “bottom-right”);
secondRoot.last = bottomRight;
return root;
}
private static class SplitNode {
boolean leaf;
private SplitNode first;
private SplitNode last;
private Orientation orientation;
private String name;
public SplitNode(boolean leaf, String name) {
this.leaf = leaf;
this.name = name;
}
}
}
so you can use it like that:
public void start(Stage primaryStage) {
primaryStage.setTitle(“Hello World!”);
MultiSplitPane pane = new MultiSplitPane();
pane.setLayout(pane.testModel());
pane.addNode(“left”, new Button(“left”));
pane.addNode(“top-right”, new Button(“top-right”));
pane.addNode(“bottom-right”, new Button(“bottom-right”));
primaryStage.setScene(new Scene(pane, 300, 250));
primaryStage.show();
}
Still, I agree that a full blown docking framework with minimize/maximize, floating, docking, etc. like in Netbeans, Eclipse or Jide is definitely missing in JavaFX. It would be fantastic to have that out of the box in JavaFX.
Hello Jonathan,
The tricky part with a split pane is how to set the min/pref/max sizes of the individual splits. Does it take those values directly from the component in the split or can you set it on the split pane?
How do one specify how the splits should grow? This can be tricky to get right if it isn´t supported properly by the split pane since there´s no way to express this in min/pref/max size.
Will the split adhere to the maximum size of the component?
Cheers,
Mikael
Mikael,
I’m bound to get the bulk of these answers wrong, so I’ll ask the current owner of the SplitPane to answer your questions next week when he’s back at work.
The only thing I’ll add is that we support accessing the dividers directly from the SplitPane, such that you can set the position of each divider. We are thinking about adding further API to the SplitPane.Divider API in the future, so any feedback you have in this area would be much appreciated.
— Jonathan
Mikael,
The min/pref/sizes are taken directly from the content in the split. Currently the split does not adhere to the max size of the content. A bug has been filed for this issue already.
Kinsley
Thanks.
Just to be clear, with “splits” I mean the areas between the dividers.
On a separate note, it would be really useful if one could get notified of replies in some way. Now it´s easy to forget to go back and check..
Hmmm, I definitely get notification, so the emails can be sent out. I’ll look into adding some functionality to allow for notifications to be sent if requested.
Thanks,
Jonathan
Ok – I’ve installed a comment notification plugin. You can subscribe at the bottom of the comments section.
I hope it works 🙂
Now I just have to educate myself how remember to respond to a post and not the thread. 🙂
COOL! That was fast!
Hello, Jonathan!
Please, can you clarify a simple binding question, which can help to others, I hope?
I want to put button exactly in center of scene.
I use binding as:
btn.translateXProperty().bind(scene.widthProperty().divide(2).subtract(btn.widthProperty());
All work perfectly, except one thing – for real symmetrical view we must subtract only half of button’s width, of course. And that problem is dead end for me.
At this time, actual width of button equals zero, so naive subtraction of btn.getWidth/2 do nothing.
Best way, that I found for now is using constant preferredSize for button and subtraction of preferredSize/2. But it is quite verbose, I think…
Please, is here more elegant solution?
If you want to do this with binding, you need to use another high level construct like “minus” and “divide” so that when the button width changes, things are repositioned.
However personally I wouldn’t use binding for positioning of stuff like this, because it is too complicated and heavyweight. I would just use a layout pane. I believe StackPane already does what you want. If you had to write one from scratch, that is pretty easy to (just subclass Pane and override the layoutChildren method and do simple layout there).
hey guys…great to see some javafx examples online.
Why you’re not publishing these examples as applets? I would like to see these samples embed in the html page…at the end javafx 2.0 is a competitor to flash..isn’t it?
I had a look at the applet samples included in the SDK but I would like to applet next to the source code.
Do you plan to get the JavaFx ‘Samples’ section back online (it used to be at http://javafx.com/samples)
Best
kzer,
This is going to sound really lame – but it’s just because the three of us are swamped with work! Despite appearances, this is our personal blog and we don’t work on this blog in work hours. If writing this blog was our day job, I can guarantee it’ll have a heap more applets, as well as sample applications, tutorials, etc. Our day jobs are actually really, really, really busy right now with just getting JavaFX 2.0 out the door. We’re doing our best to keep this site up to date. If you’re at all interested, you can see what each of us do on the about page.
However, seeing as you’re asking for it I’m sure we’ll consider putting up some applet demos when time permits.
Finally, it would be great to get the JavaFX.com samples section up and running with all new samples. Jasper would be the best guy to ask about that – he is the one responsible for samples in JavaFX 2.0, including applications like Ensemble that is shipping with the beta.
— Jonathan
There is another even more important reason — at the moment you must install the FX SDK in order to have FX applets work in your browser. It won’t be until GA that a random person visiting your website will be able to download and install the FX runtime. So if we put applets up, they wouldn’t work yet except for people who have installed the SDK, which would cause people to get the impression that FX applets simply don’t work. Which would be incorrect.
I think I’ll mention this as I always thought it would be useful in Swing.
Drag and drop of slit panes! Yes I’d like the ability to be able to drag a pane from one area of split pane layout to another. Some kind of snap to feature would be nice. It’s just an idea but I think it would be useful.
If we take some of the examples seen on the site so far. Imagine an application with two information panels on the left, one on top of the other and say a map view as the main view on the right taking 3/4 of the space. Now normally this would be ideal but some users might prefer one of the information panels to be the main panel to be the main panel, the drag it over the map and the map snaps to where the information panel was and the info panel to where the map was.
Obviously there would be a vertical split between the two side panels and the main panel and the panel containing the side panel would have a vertical split for them.
Just an idea!
Hi Steve, this sounds more like a request for a docking framework, since the split pane itself can’t know anything about it (requires some kind of UI gesture based on the content within the split). Typically a docking framework would take TitledPanes (or some specialized subclass) which then give a title bar which can be dragged and so forth.
This is actually the second request for a docking framework I’ve heard, would you like to file a JIRA feature request?
Good idea Richard RT-14039 added.
What’s the fxml look like for this ?
where does one find at schema or DTD or xlt like thing for the xml in the FXML files ? I’m spending too much trial and error on figuring out how to nest stuff in splipanes. If I had a DTD of th javafx* it might help ?
Thanks,
-jim
Hi all,
I have a Swing JTabbedPane where I plot a Swing JInternalFrame, I would like to add a FX SplitPane inside this JInternalFrame, how can I accomplish this?
Thanks all
Alberto
how to restrict splitpane line so that it can’t be resized after running the application..plz mail me.
thanks